To start with I want to talk about the kinds of build services we can set up:
Continuous Integration (CI) - A build designed for when developers check in code. Usually ensures that the code being checked in compiles and that all unit tests pass.
Continuous Delivery (CD) - Happens when code is promoted to an environment, such as QA, built and deployed out to the app deployment service to be used for testing. Code promotion usually happens as code is merged into a branch for that purpose, such as a QA branch.
There is also a concept of Continuous Deployment, that is in many ways similar to Continuous Delivery expect the build is pushed to the production environment. For this blog post I will focus on continuous delivery for Xamarin when code is moved to a QA branch from a Development branch. I hope to follow it up by posts for CI and also for Native technologies and Cordova using VSTS and MacInCloud.
The technologies covered by this post:
Visual Studio Team Services (VSTS)
Xamarin Android
Xamarin iOS
MacInCloud VSTS Agent
HockeyApp
What do I want to accomplish when doing my CD Build:
Kick off when moving code into the QA branch
Register my Xamarin Account
Get all required dependencies
Change version number of Android and iOS code
Build iOS and Android code
Sign Android and iOS code
Generate required documentation (will cover in a later post)
Deploy out to HockeyApp
I won't go into how to connect the VSTS MacInCloud agent to VSTS. A good post that explains this can be found here: Getting Started with the MacinCloud VSTS Build Agent Plan. I also won't go into branching strategies, I assuming multiple branches with at least Development, QA and Release branches. I use git style repositories but the TFS style repositories will work as well.
What I assume is already done:
VSTS repository created
Branching implemented
MacInCloud VSTS agent purchased
MacInCloud agent created and connected to VSTS
iOS certificates and provisioning profiles uploaded to MacInCloud agent
Note: If you ever want to change the pool name that the agent is connected to, it will submit a request in the MacInCloud portal but it doesn't seem that the request is processed immediately. It may take a few hours for it to occur during which time you cannot build with the agent. Be cognizant of this when changing the pool name after the initial agent setup (which seems to happen nearly immediately).
Note: It may happen that the agent gets locked up or otherwise seems to stop responding. Unfortunately, at this time there is no way to manually reset the agent. You will need to create a support ticket with MacInCloud. Luckily they are very responsive and always got back to me later in the day.
Note: For Xamarin, a MacInCloud VSTS build agent can pretty much do all the build types you can do in Xamarin Studio on a Mac. However, that is not all types of .Net applications. For example, if you want to compile a UWP project as part of a Xamarin Forms solution, that part of the build would have to occur on a Windows build agent.
Setting up the build steps
Kick off when moving code into the QA branch
A last note on build steps. I called my branch to cause the CD build to run QA. Also I used the Ad-Hoc build definition to setup all the project settings for QA builds. In my VSTS project I created a new build configuration called "QA Build". I named my MacInCloud VSTS agent queue: Xamarin. My VSTS configuration for Repository, Triggers and General tabs to kick off the build looks like this:


Register my Xamarin Account
On the Build Tab we can start adding steps. There is one task that we care about to start, Activate Xamarin License. We need to add it to the build process four times. Twice at the beginning to activate the licenses for iOS and Android and twice at the end to deactivate them.
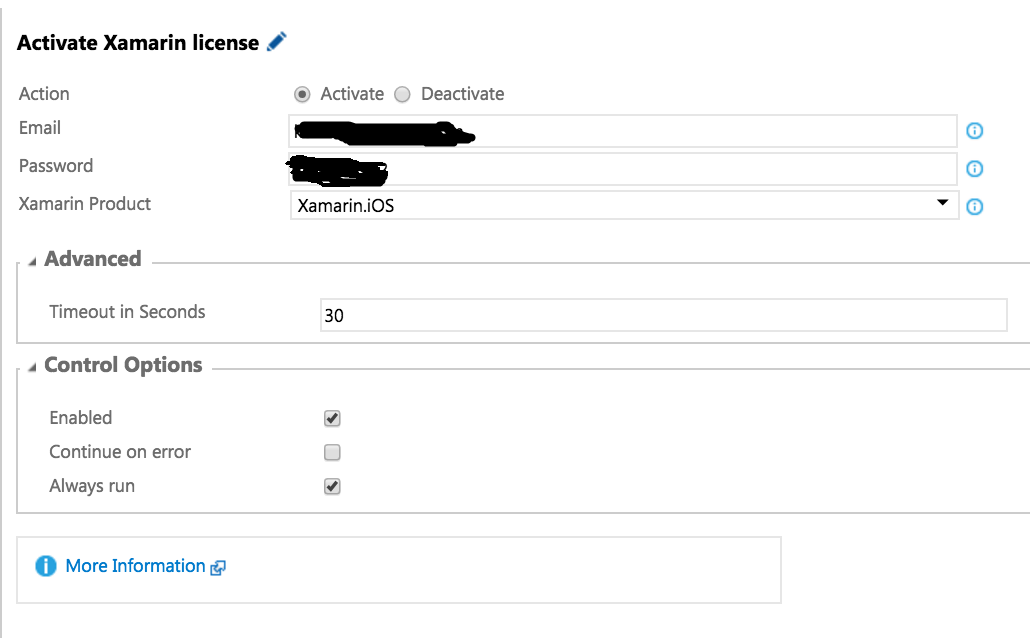

Note: Xamarin is now free and for many builds these steps may not be necessary. For some build options, such as embedding assemblies in native code for Android, an Enterprise Xamarin subscription or MSDN Enterprise license are still required. As the formal licensing switches from the Xamarin licensing scheme to the MSDN subscription scheme, these steps will likely slightly change.
Get all required dependencies
There are two tasks that can help here, Nuget Installer and Xamarin Component Restore. Put in tasks for one or both of these depending on where your packages come from. Currently, I'm using just Nuget packages and left the default to restore for all solutions in the branch.

Change version number of Android and iOS code
Each and every build put into HockeyApp needs a unique build number that is ever increasing for it to understand what is the latest build. It does not use the upload or compile date as the primary mechanism for this, instead it uses the build number. A newer build will be thought to be older by HockeyApp if it has a lower build number than another in HockeyApp even if the version name looks higher.
Both Android and iOS has two build identifiers, one a human readable version name such as 1.3.2 or 1.3.3 and one an ever increasing sequence of numbers that is used to tell which is newer. In Android in the AndroidManifest the VersionName is the human readable name and the VersionCode is the ever increasing number to tell what is newer. For iOS the equivalent settings can be found in the info.plist under CFBundleVersion is the ever increasing number and CFBundleShortVersionString is the human readable name.
To handle this in VSTS I use a task called Version Assemblies that is part of Colin's ALM Corner Build and Release Tools. This is not a standard VSTS task so you will have to go out to the Marketplace (click Add Build Step then select "Don't see what you need? Check out our Marketplace." The Version Assemblies task allows you to search a file in search control for a RegEx match and replace it with part of the VSTS project's Build number.
Setup VSTS variables
To specify the build name I created a VSTS variable. This is done on the Variables Tab of VSTS setup. In this case I want the version name to be 1.3.0. When I change the version name, I will go here and change it. There are other ways to do this, but this is based on the use of the Version Assemblies Task.

Then I setup the build number format on the general tab. This will use the current date, the value in the VersionNumber variable and the BuildID.
$(date:yyyyMMdd)_$(VersionNumber).$(BuildID)

Note: Some samples I have seen, including the one for the task, show using the TFS revision number for this and using that for the build number. I highly recommend against this. The revision number resets on a daily basis or when anything else changes in the build number. This won't lead to an ever increasing number we can use for Android and iOS to tell what the latest is.
Setup iOS placeholder versions
Due to the structure of the iOS info.plist file it won't be easy for our task to find the right keys to replace. So we are going to use some numbers that will work fine for development, but ones that our build service will be able to find and replace. In the info.plist file I set the values as follows:
<key>CFBundleShortVersionString</key>
<string>1.0.0.0</string>
<key>CFBundleVersion</key>
<string>1.0.0.0.0</string>
Add Version Number tasks for iOS
Add two Version Assemblies tasks, one for the CFBundleShortVersionString, and one for the CFBundleVersion. Since a regex that finds and replaces 1.0.0.0 for the CFBundleShortVersionString will also find the first part of the CFBundleVersion, I recommend replacing the CFBundle version first in the build order. Here is how I set those up. With the the CFBundleShortVersionString will end up with the value in our VersionNumber variable (like 1.3.1) and the CFBundleVersion will end up with the unique and ever increasing BuildID.
(You will need to open the advanced area)
Build Regex Pattern: (?:\d\d\d\d\d\d\d\d_)(\d+.\d+.\d+.)(\d+)
Build Regex Group Index: 2
Regex Replace Pattern: (\d+.\d+.\d+.\d+.\d+)
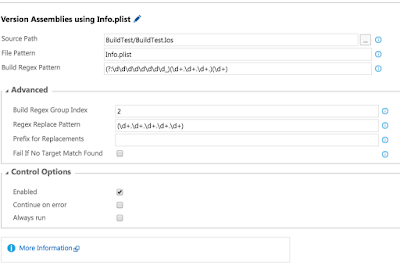
Build Regex Pattern: (?:\d\d\d\d\d\d\d\d_)(\d+.\d+.\d+)(.\d+)
Build Regex Group Index: 1
Regex Replace Pattern: (\d+.\d+.\d+.\d+)
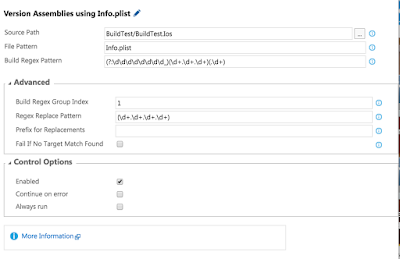
Build Regex Group Index: 1
Regex Replace Pattern: versionName="\d+.\d
Prefix for Replacements: versionName="

Build Regex Pattern: (?:\d\d\d\d\d\d\d\d_)(\d+.\d+.\d+.)(\d+)
Build Regex Group Index: 2
Regex Replace Pattern: versionCode="\d+
Prefix for Replacements: versionCode="
(You will need to open the advanced area)
Build Regex Pattern: (?:\d\d\d\d\d\d\d\d_)(\d+.\d+.\d+.)(\d+)
Build Regex Group Index: 2
Regex Replace Pattern: (\d+.\d+.\d+.\d+.\d+)

Build Regex Pattern: (?:\d\d\d\d\d\d\d\d_)(\d+.\d+.\d+)(.\d+)
Build Regex Group Index: 1
Regex Replace Pattern: (\d+.\d+.\d+.\d+)

Setup Android placeholder versions
In the Android Application.Manifest ensure the versionName is two numbers separated by a period such as 1.2 and that the versionNumber is a number without a period like 4.
Add Version Number Tasks for Android
Build Regex Pattern: (?:\d\d\d\d\d\d\d\d_)(\d+.\d+.\d+)(.\d+)Build Regex Group Index: 1
Regex Replace Pattern: versionName="\d+.\d
Prefix for Replacements: versionName="

Build Regex Pattern: (?:\d\d\d\d\d\d\d\d_)(\d+.\d+.\d+.)(\d+)
Build Regex Group Index: 2
Regex Replace Pattern: versionCode="\d+
Prefix for Replacements: versionCode="

Build iOS and Android code
Build iOS Code
I build the iOS code first by using the Xamarin.iOS build step. I add it in and point to a solution that contains all the iOS projects and any shared PCLs. The configuration I use the $(BuildConfiguration) variable which I set to Ad-Hoc. This will build the targeted solution in the Ad-Hoc build configuration with all appropriate build settings.

Note: I leave the Signing and Provisioning profile section blank. Instead I have defined the proper certificate and profile in the Ad-Hoc configuration project properties for the iOS projects. These correspond to the signing and provisioning profiles that I have already uploaded to my VSTS build agent in MacInCloud.
Note: I encountered an error "user interaction is not allowed" which had to do with the keychain for the certificates I uploaded being locked. I'm not sure how this happened and there is likely nothing you can do to fix it yourself. I submitted a ticket and the MacInCloud support team was able to quickly change something on their end to resolve the issue.
Note: I could have also included the Android projects in the solution and they would have built. However, I wanted direct control over their building and signing so I created a solution used only for the builds that only contains the shared PCLs and iOS projects so I wouldn't build the Android projects twice. It also gives me higher level quick visibility if it was the iOS and Android part of the build that failed.
Build Android Code
Here I used the Xamarin.Android task. Instead of pointing to a solution, it points to a particular project. I also added and additional argument, /t:SignAndroidPackage that forces it to build an .APK.

Note: I didn't include anything in the project file about sighing the APK because that would require me to keep my signing information in the project file itself. Instead I used a separate Android Signing build task and kept the certificate's authentication information in variables in the VSTS build definition.
Note: At first I received an error, "The Android SDK Directory could not be found. Please set via /p:AndroidSdkDirectory." This had to do with the ANDROID_HOME environment variable not being set correctly in the agent. If you put in a ticket, the MacInCloud support team can fix this for you.
Sign Android and iOS code
There is nothing to do here for iOS, as the code signing occurred as part of the iOS build process. For Android I added an Android Signing task to the build steps. I also added the appropriate keystore file into source control so I could reference it as part of the build.Setup Keystore Variables
Granted, these are not very good passwords, but they will do for this test. Create these three variables in your build definition with the proper credentials for your keystore.
Add Android Signing Task
Use the following configuration for the Android Signing. The keystore should be located within your source code checked into the branch that is building.
Note: The first time I tried this I received an error, "Path must be a string…”. After searching and finding it wasn't a setting on the task, I found this was caused by the JAVA_HOME environment variable not being setup on the VSTS build agent. I submitted a ticket and they got the JDK properly setup with this variable defined and everything started working.
Deploy out to HockeyApp
Luckily there is already a task for deploying to HockeyApp in VSTS. We need to add two of these tasks to our build definition, one for Android and one for iOS. On the first one you add you will need to setup the connection between HockeyApp and VSTS. To do this press the manage link on the HockeyApp connection section of the task. This will bring up an area where you can create a new connection. It will ask for an API Token.
The API Token can be found in HockeyApp under Account Settings \ API Tokens. I created one with Full Access though only Upload and Release is probably sufficient. Copy the created API token back into the VSTS HockeyApp connection.

Setup Apps in HockeyApp
You will need to setup two apps in HockeyApp, one for Android and one for iOS. I manually created them and set the Bundle Identifier (iOS) and package name (Android). Each one of these HockeyApp applications gave me an App Id that I could then copy back into the HockeyApp deployment task in the VSTS build.

Finalize Deployment Settings
For both the Android and iOS HockeyApp deployment tasks I added information on what binaries to deploy. I could also set release notes (later post), debug symbols and restrictions on who can download.Android

iOS

Final Thoughts
This took a fair amount of trial and error to get it right. I'm hoping that this can be used by others as it is moving toward codification as part of Magenic's new recommended CD process. I'm sure there is some cleanup to be done and I wanted to get this down while it was fresh in my mind. Let me know if you have any issues with it. Here is a view of the full list of build steps: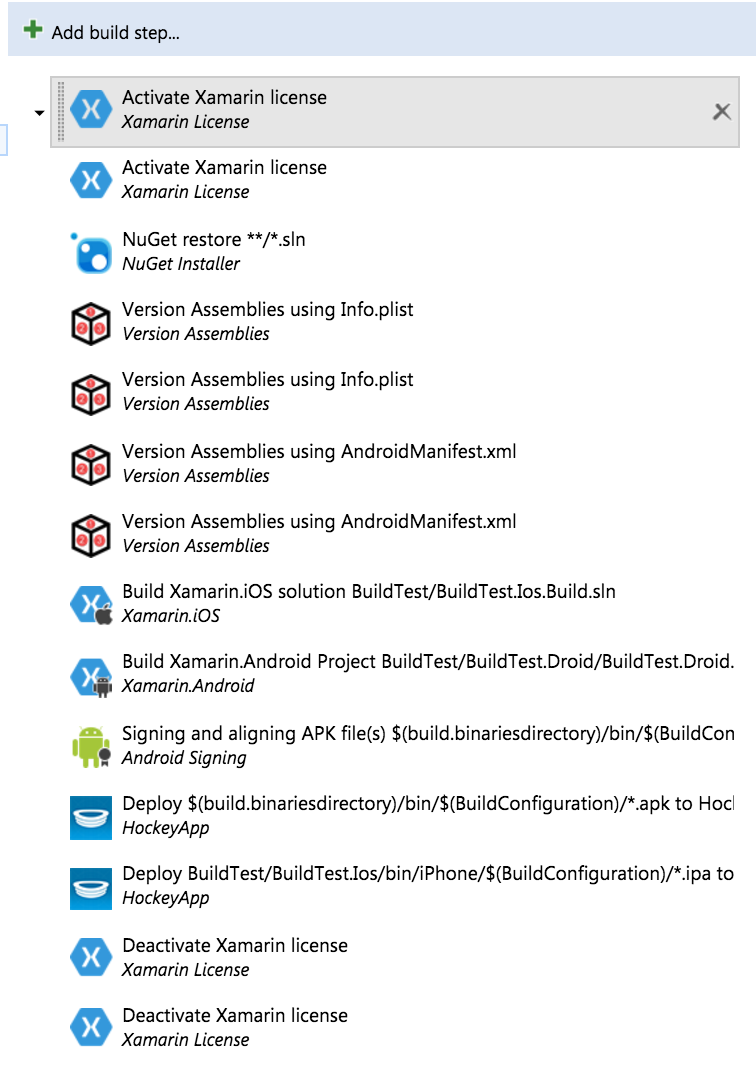
What the builds look like in HockeyApp for Android:

For my simple solution the entire continuous delivery process takes less than 3.5 minutes.
Good Article on Xamarin...
ReplyDeleteXamarin technology is ruling the App development industry now!
DevRabbit is helping the start ups and large businesses in accelerating their growth through cutting edge technology by leveraging Mobile App Development for iPhone and Android, Cloud Solution, Web Application Development & Big data analytics solutions, Digital Marketing services. DevRabbit is a Xamarin Consulting Company.
Xamarin in Glorium Technologies is taking one of the leading positions among other development languages. And it is quite reasonable, as it has loads of benefits, like sharable business logic that lets create apps cross-platformly, but still they remain native. And users are happy with native UI.
ReplyDeleteVery Interesting information shared than other blogs. Thanks for Sharing and Keep updating us. Xamarin development India
ReplyDelete