Showing posts with label Android. Show all posts

Tuesday, August 8, 2017

Visual Studio Mobile Center: Solving a Problem with Package Restore

Visual Studio Mobile Center is shaping up to be a great tool. Where before it had taken me a week to set up the builds in VSTS it now takes less than an hour. This speed and simplicity does come at a cost, mostly in terms of not having a lot of fine control over the build process. About a month ago this caused a problem for me.

I don't have full control of a repository I was trying to build using VSMC. That is to say the QA group added a directory with their test solutions. This was fine except that test solution required a Nuget package that was hosted on our company's internal Nuget server. Why was this a problem? Because VSMC will try and restore packages for any and all solutions it finds in the repository, even ones I'm not trying to build with VSMC and that meant the package restore step failed every time.

Luckily about the time this happened, VSMC implemented a feature I (and probably others) have been asking for. The ability to create custom build steps. There are three custom scripts that can be added, one right after the source code is retrieved (post-clone), one right before the solution is built (pre-build) and one right after the solution has been built (post-build). For Android and iOS apps the build happens on a Mac so bash scripts need to be made, for UWP apps the build happens on a Windows machine so Powershell scripts are needed. For more information you can check out their easy to read documentation:

VSMC Build Scripts

How does this help me and my error? Well as it turns out I can create a post-clone script that deletes the test project folder out of the cloned repository *BEFORE* the Nuget package restore happens. I don't need anything in there so no problem removing it. For my particular case I am doing Xamarin iOS and Android builds. That means I need to create a Bash script.

The script must be a specific name, mobile-center-post-clone.sh for a post clone shell script. It also has to be in the same directory as the solution or project to build. Because the solution that built my iOS project and the project for the Android application were in different locations, I needed two copies of this same script.

Here is the script I created:

 #!/usr/bin/env bash  
 echo “removing test automation directory”  
 set -e  
 rm -rf $MOBILECENTER_SOURCE_DIRECTORY/testAutomation  

The most important line in the script is the last one. It removes the entire directory from the build server where the QA project resides that is causing the problem. Notice that I am also using one of the built in build variables, $MOBILECENTER_SOURCE_DIRECTORY. This inserts the location of the root directory where the source code was copied to. It allows my script to work anywhere so I can use the same one for the iOS build and the Android build. It works like a charm.


Note: You may have to re-save your build configuration before it picks up that the scripts are there. The above picture shows that the build definition has detected my post-clone script.

That's it. If you are having issues with the Nuget restore step on a project you are not trying to build, you can just remove it using such a script. You could also do things with scrips like running UI tests after the build or changing the app Ids before the build. This is a great addition to Visual Studio Mobile Center.

Tuesday, May 31, 2016

Setting Up Builds With Xamarin Using MacInCloud and VSTS

For many of us doing mobile work the ability to create great continuous integration and continuous delivery solutions has been hampered by the lack of enterprise support for Macs and generally the lack of available build agents that work with iOS and even Android projects. Recently MacInCloud released a Visual Studio Team Services (VSTS) build agent that can work with native, Xamarin and Cordova development for iOS and Android. For Magenic this is exactly what we need so I have been working through creating a repeatable process that we can use project after project to stand up this sort of build service.

To start with I want to talk about the kinds of build services we can set up:

Continuous Integration (CI) - A build designed for when developers check in code. Usually ensures that the code being checked in compiles and that all unit tests pass.

Continuous Delivery (CD) - Happens when code is promoted to an environment, such as QA, built and deployed out to the app deployment service to be used for testing. Code promotion usually happens as code is merged into a branch for that purpose, such as a QA branch.

There is also a concept of Continuous Deployment, that is in many ways similar to Continuous Delivery expect the build is pushed to the production environment. For this blog post I will focus on continuous delivery for Xamarin when code is moved to a QA branch from a Development branch. I hope to follow it up by posts for CI and also for Native technologies and Cordova using VSTS and MacInCloud.

The technologies covered by this post:
Visual Studio Team Services (VSTS)
Xamarin Android
Xamarin iOS
MacInCloud VSTS Agent
HockeyApp

What do I want to accomplish when doing my CD Build:
Kick off when moving code into the QA branch
Register my Xamarin Account
Get all required dependencies
Change version number of Android and iOS code
Build iOS and Android code
Sign Android and iOS code
Generate required documentation (will cover in a later post)
Deploy out to HockeyApp

I won't go into how to connect the VSTS MacInCloud agent to VSTS. A good post that explains this can be found here: Getting Started with the MacinCloud VSTS Build Agent Plan. I also won't go into branching strategies, I assuming multiple branches with at least Development, QA and Release branches. I use git style repositories but the TFS style repositories will work as well.

What I assume is already done:
VSTS repository created
Branching implemented
MacInCloud VSTS agent purchased
MacInCloud agent created and connected to VSTS
iOS certificates and provisioning profiles uploaded to MacInCloud agent
Note: If you ever want to change the pool name that the agent is connected to, it will submit a request in the MacInCloud portal but it doesn't seem that the request is processed immediately. It may take a few hours for it to occur during which time you cannot build with the agent. Be cognizant of this when changing the pool name after the initial agent setup (which seems to happen nearly immediately).
Note: It may happen that the agent gets locked up or otherwise seems to stop responding. Unfortunately, at this time there is no way to manually reset the agent. You will need to create a support ticket with MacInCloud. Luckily they are very responsive and always got back to me later in the day.
Note: For Xamarin, a MacInCloud VSTS build agent can pretty much do all the build types you can do in Xamarin Studio on a Mac. However, that is not all types of .Net applications. For example, if you want to compile a UWP project as part of a Xamarin Forms solution, that part of the build would have to occur on a Windows build agent.

Setting up the build steps

Kick off when moving code into the QA branch

A last note on build steps. I called my branch to cause the CD build to run QA. Also I used the Ad-Hoc build definition to setup all the project settings for QA builds. In my VSTS project I created a new build configuration called "QA Build". I named my MacInCloud VSTS agent queue: Xamarin. My VSTS configuration for Repository, Triggers and General tabs to kick off the build looks like this:


Register my Xamarin Account

On the Build Tab we can start adding steps. There is one task that we care about to start, Activate Xamarin License. We need to add it to the build process four times. Twice at the beginning to activate the licenses for iOS and Android and twice at the end to deactivate them.


Note: Xamarin is now free and for many builds these steps may not be necessary. For some build options, such as embedding assemblies in native code for Android, an Enterprise Xamarin subscription or MSDN Enterprise license are still required. As the formal licensing switches from the Xamarin licensing scheme to the MSDN subscription scheme, these steps will likely slightly change.

Get all required dependencies

There are two tasks that can help here, Nuget Installer and Xamarin Component Restore. Put in tasks for one or both of these depending on where your packages come from. Currently, I'm using just Nuget packages and left the default to restore for all solutions in the branch.

Change version number of Android and iOS code 

Each and every build put into HockeyApp needs a unique build number that is ever increasing for it to understand what is the latest build. It does not use the upload or compile date as the primary mechanism for this, instead it uses the build number. A newer build will be thought to be older by HockeyApp if it has a lower build number than another in HockeyApp even if the version name looks higher.

Both Android and iOS has two build identifiers, one a human readable version name such as 1.3.2 or 1.3.3 and one an ever increasing sequence of numbers that is used to tell which is newer. In Android in the AndroidManifest the VersionName is the human readable name and the VersionCode is the ever increasing number to tell what is newer. For iOS the equivalent settings can be found in the info.plist under CFBundleVersion is the ever increasing number and CFBundleShortVersionString is the human readable name.

To handle this in VSTS I use a task called Version Assemblies that is part of Colin's ALM Corner Build and Release Tools. This is not a standard VSTS task so you will have to go out to the Marketplace (click Add Build Step then select "Don't see what you need? Check out our Marketplace." The Version Assemblies task allows you to search a file in search control for a RegEx match and replace it with part of the VSTS project's Build number.

Setup VSTS variables

To specify the build name I created a VSTS variable. This is done on the Variables Tab of VSTS setup. In this case I want the version name to be 1.3.0. When I change the version name, I will go here and change it. There are other ways to do this, but this is based on the use of the Version Assemblies Task. 


Then I setup the build number format on the general tab. This will use the current date, the value in the VersionNumber variable and the BuildID. 

$(date:yyyyMMdd)_$(VersionNumber).$(BuildID)


Note: Some samples I have seen, including the one for the task, show using the TFS revision number for this and using that for the build number. I highly recommend against this. The revision number resets on a daily basis or when anything else changes in the build number. This won't lead to an ever increasing number we can use for Android and iOS to tell what the latest is.

Setup iOS placeholder versions

Due to the structure of the iOS info.plist file it won't be easy for our task to find the right keys to replace. So we are going to use some numbers that will work fine for development, but ones that our build service will be able to find and replace. In the info.plist file I set the values as follows:

<key>CFBundleShortVersionString</key>
<string>1.0.0.0</string>
<key>CFBundleVersion</key>
<string>1.0.0.0.0</string>

Add Version Number tasks for iOS

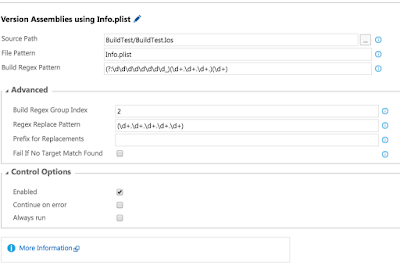
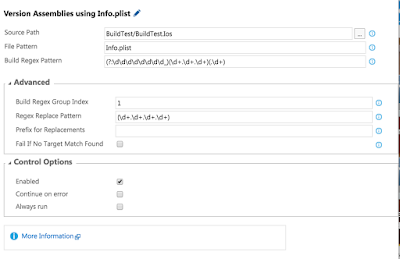
Add two Version Assemblies tasks, one for the CFBundleShortVersionString, and one for the CFBundleVersion. Since a regex that finds and replaces 1.0.0.0 for the CFBundleShortVersionString will also find the first part of the CFBundleVersion, I recommend replacing the CFBundle version first in the build order. Here is how I set those up. With the the CFBundleShortVersionString will end up with the value in our VersionNumber variable (like 1.3.1) and the CFBundleVersion will end up with the unique and ever increasing BuildID.

(You will need to open the advanced area)
Build Regex Pattern:  (?:\d\d\d\d\d\d\d\d_)(\d+.\d+.\d+.)(\d+)
Build Regex Group Index: 2
Regex Replace Pattern: (\d+.\d+.\d+.\d+.\d+)


Build Regex Pattern:  (?:\d\d\d\d\d\d\d\d_)(\d+.\d+.\d+)(.\d+)
Build Regex Group Index: 1
Regex Replace Pattern: (\d+.\d+.\d+.\d+)


Setup Android placeholder versions

In the Android Application.Manifest ensure the versionName is two numbers separated by a period such as 1.2 and that the versionNumber is a number without a period like 4.

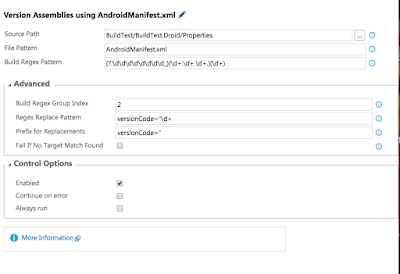
Add Version Number Tasks for Android

Build Regex Pattern:  (?:\d\d\d\d\d\d\d\d_)(\d+.\d+.\d+)(.\d+)
Build Regex Group Index: 1
Regex Replace Pattern: versionName="\d+.\d
Prefix for Replacements: versionName="


Build Regex Pattern:  (?:\d\d\d\d\d\d\d\d_)(\d+.\d+.\d+.)(\d+)
Build Regex Group Index: 2
Regex Replace Pattern: versionCode="\d+
Prefix for Replacements: versionCode="

Build iOS and Android code

Build iOS Code

I build the iOS code first by using the Xamarin.iOS build step. I add it in and point to a solution that contains all the iOS projects and any shared PCLs. The configuration I use the $(BuildConfiguration) variable which I set to Ad-Hoc. This will build the targeted solution in the Ad-Hoc build configuration with all appropriate build settings.


Note: I leave the Signing and Provisioning profile section blank. Instead I have defined the proper certificate and profile in the Ad-Hoc configuration project properties for the iOS projects. These correspond to the signing and provisioning profiles that I have already uploaded to my VSTS build agent in MacInCloud.
Note: I encountered an error "user interaction is not allowed" which had to do with the keychain for the certificates I uploaded being locked. I'm not sure how this happened and there is likely nothing you can do to fix it yourself. I submitted a ticket and the MacInCloud support team was able to quickly change something on their end to resolve the issue.
Note: I could have also included the Android projects in the solution and they would have built. However, I wanted direct control over their building and signing so I created a solution used only for the builds that only contains the shared PCLs and iOS projects so I wouldn't build the Android projects twice. It also gives me higher level quick visibility if it was the iOS and Android part of the build that failed. 

Build Android Code

Here I used the Xamarin.Android task. Instead of pointing to a solution, it points to a particular project. I also added and additional argument, /t:SignAndroidPackage that forces it to build an .APK. 


Note: I didn't include anything in the project file about sighing the APK because that would require me to keep my signing information in the project file itself. Instead I used a separate Android Signing build task and kept the certificate's authentication information in variables in the VSTS build definition.
Note: At first I received an error, "The Android SDK Directory could not be found. Please set via /p:AndroidSdkDirectory." This had to do with the ANDROID_HOME environment variable not being set correctly in the agent. If you put in a ticket, the MacInCloud support team can fix this for you.

Sign Android and iOS code

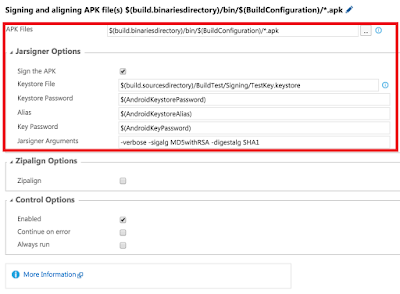
There is nothing to do here for iOS, as the code signing occurred as part of the iOS build process. For Android I added an Android Signing task to the build steps. I also added the appropriate keystore file into source control so I could reference it as part of the build.

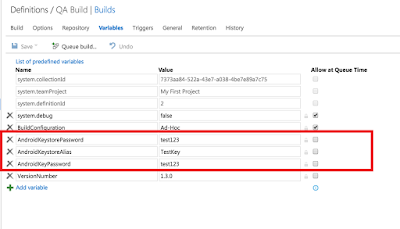
Setup Keystore Variables

Granted, these are not very good passwords, but they will do for this test. Create these three variables in your build definition with the proper credentials for your keystore.


Add Android Signing Task

Use the following configuration for the Android Signing. The keystore should be located within your source code checked into the branch that is building.


Note: The first time I tried this I received an error, "Path must be a string…”. After searching and finding it wasn't a setting on the task, I found this was caused by the JAVA_HOME environment variable not being setup on the VSTS build agent. I submitted a ticket and they got the JDK properly setup with this variable defined and everything started working.

Deploy out to HockeyApp

Luckily there is already a task for deploying to HockeyApp in VSTS.  We need to add two of these tasks to our build definition, one for Android and one for iOS. On the first one you add you will need to setup the connection between HockeyApp and VSTS. To do this press the manage link on the HockeyApp connection section of the task. This will bring up an area where you can create a new connection. It will ask for an API Token.


The API Token can be found in HockeyApp under Account Settings \ API Tokens. I created one with Full Access though only Upload and Release is probably sufficient. Copy the created API token back into the VSTS HockeyApp connection.

Setup Apps in HockeyApp

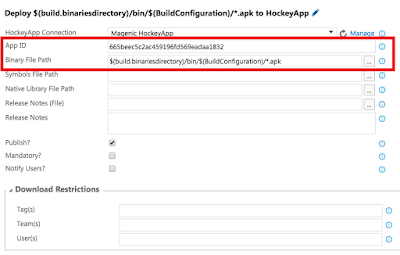
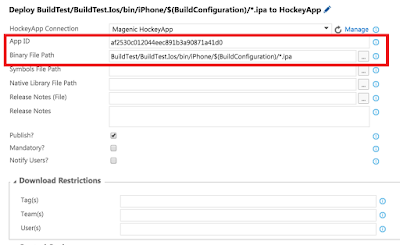
You will need to setup two apps in HockeyApp, one for Android and one for iOS. I manually created them and set the Bundle Identifier (iOS) and package name (Android). Each one of these HockeyApp applications gave me an App Id that I could then copy back into the HockeyApp deployment task in the VSTS build.

Finalize Deployment Settings

For both the Android and iOS HockeyApp deployment tasks I added information on what binaries to deploy. I could also set release notes (later post), debug symbols and restrictions on who can download.

Android


iOS


Final Thoughts

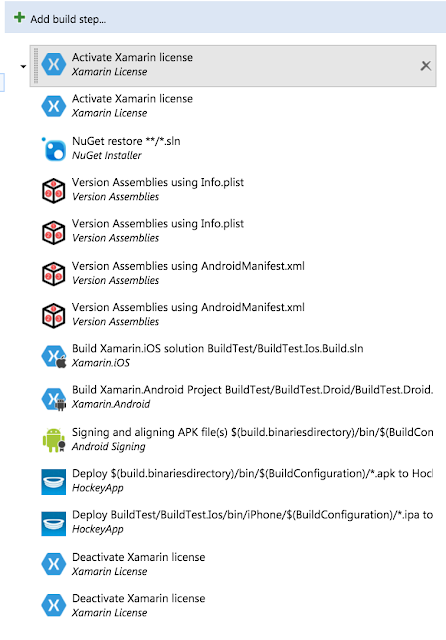
This took a fair amount of trial and error to get it right. I'm hoping that this can be used by others as it is moving toward codification as part of Magenic's new recommended CD process. I'm sure there is some cleanup to be done and I wanted to get this down while it was fresh in my mind. Let me know if you have any issues with it. Here is a view of the full list of build steps:


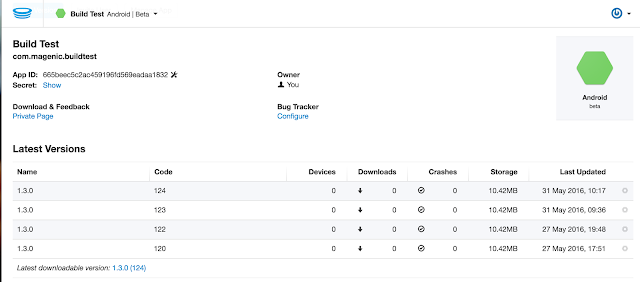
What the builds look like in HockeyApp for Android:


For my simple solution the entire continuous delivery process takes less than 3.5 minutes.

Wednesday, April 29, 2015

Microsoft's Windows 10 Allows You to Run Android and iOS Apps

Today Microsoft made an announcement that Windows 10 will allow Android applications to run in an Android AOSP subsystem. Additionally, Objective-C applications can be compiled and run on Windows 10 as well as universal applications. These announcements, particularly the later, surprised and excited many of us. I've been speaking with a lot of people both inside and outside of Magenic on what all of this means, or could possibly mean, given our limited understanding. (For details See Kevin McLaughlin's article and Mary Jo Foley's article)

First there are some pretty important technical questions raised by this:
- What will the applications look like in Windows 10? If the Android applications are just running in a ASOP subsystem then presumably you would have a bunch of applications looking and navigating like native Android applications on your Windows 10 device. That may be OK for some applications but probably not others.

- How about access to system services and 3D rendering? If I need access to the hardware GPS can one application running in the Android subsystem do that while a Windows 10 application tries to get at it at the same time. This could be handled but I'm curious as to the level to which it is handled or if there be dragons.

- For Objective-C what if my application is accessing HealthKit? I assume HealthKit is not available in Windows 10 when I port my code. When running an Android application how about Google services, can I install them in the subsystem?

- It seems Apple is putting a huge effort behind Swift but MS only mentioned Objective-C; will there be Swift support some time in the future? I just finished writing a white paper on when to use Objective-C vs. Swift. Until and unless MS also supports doing this with Swift, this could change the equation for applications that ever may be expected to run on Windows 10. For that concern, Objective-C would be the one that could work.

- I've heard that Objective-C apps may support porting over Xibs but not Storyboards. If true that could limit the applications that can be ported over without refactoring.

I look forward to learning more and getting some answers to some of these questions. Early days! :)

Even with all those questions, there are a few conclusions that we can come to with what we currently know today.

- One question I've seen floating around is do we still need solutions like Xamarin or NativeScript. The answer is absolutely yes. These new capabilities allow us to more easily run Android applications written in Java to our Windows 10 devices and compile Objective-C code into unified applications for Windows 10. What they don't do is allow you to run your applications written in Objective-C on an Android device or in Java on iOS. For this type of cross platform work you need a different cross platform tool. Then there is the question of will it look right on the platform? Technologies like Xamarin and NativeScript solve that problem, this will not.

- I've heard a comparison with when OS/2 was designed to run Windows applications to help capture the market from Windows and it did it poorly with the conclusion that Microsoft should expect the same result with Android and iOS apps running on Windows 10. Does this argument have any legs? Maybe in some ways, but not too much of a worry. OS/2 failed for many reasons, many of which had nothing to do with having Windows compatibility. But there is one area in particular where the analogy partially seems to hold true, handheld mobile devices. Like OS/2, Windows is not the dominant player in this space and is fighting entrenched leaders. But even then I don't give the argument too many legs. Like OS/2, Windows 10 will will likely stand or fall based on its strengths in the tablet space and will have an uphill battle in the mobile space just because there is so much momentum behind the leaders. If there is any detrimental impact of Android or Objective-C code on Windows 10 will be small next to that. Given the potential upside of additional applications, certainly a viable and likely small risk.

- Applications that rely on platform specific services like HealthKit or Google Play Services are unlikely to just work. The upshot of the deal, if you are writing an Objective-C or Android Java applications that accesses those services then all of the cross platform concerns come into play, just like they do writing a Xamarin application. Suddenly you have to think clearly about things like inversion of control patterns around platform specific services and writing a different implementation for the Windows platform that may change or even disable functionality.

- Microsoft has made a big deal of giving away Windows 10 and trying to get people to move. Now we see part of the reason as these capabilities are unlikely to be back ported to Windows 8.1 or Windows Phone. So the quicker users move the better. However, the enterprise is notoriously slow to move. How much this lag will carry over to the tablet space remains to be seen but it has been a much faster cycle for mobile phones.

- This move has obviously been made because it is very difficult to attract developers to a platform when there are few users and users to a platform when there are few applications. By lowering the bar to run many existing applications on Windows 10 they have made moves to help solve that equation and completely changed the price point to entry. However, this does have its limits. If I'm currently writing a native Android or iOS app, getting it to work on Windows is still not free. If I'm very lucky all I'm looking at is increased platform testing and perhaps compilation costs in terms of Objective-C. If I'm not lucky I'm re-architecting portions of my application to abstract out capabilities and services I can't access or otherwise don't work on Windows 10. For public facing apps on smart phone devices, software companies will still have to determine if that reduced cost is worth the 3% of US smart phone marketshare. Such investment may be much easier to justify in places like Europe where Windows Phone holds a 10% share.

Final thoughts
If this works well it will undoubtedly increase the attractiveness of the Windows 10 platform, particularly in the tablet space. No matter how you cut it, it is just another example in a long line of examples of how Microsoft has changed and become a very different company than it was a few short years ago. Microsoft continues to show us that it is a fighter and willing to make fundamental changes to stay relevant.

I feel great knowing that I can find enhanced utility in my ability to write Java and Objective-C. However, for my clients that need cross platform applications they almost always are looking at the two big smart phone players; Android and iOS. For that, I will continue to use tools like Xamarin and .Net.

I do wonder if this portends some future movement of MS into Xamarin's space. There were talks of acquisition last year that never materialized. Xamarin is a small player and that can work if they can hide in a niche. I see MS and Xamarin working more an more together so Microsoft is definitely getting interested in that niche. I know a lot of guys at Xamarin and they are a nice and passionate bunch that deserve credit and reward for what they have done to advance the cause and capabilities of X-Platform mobile development. No matter how this turns out I hope they receive the recognition and reward they deserve for their pioneering work.

This move by Microsoft makes a large shift in how I think about the different platforms and their capabilities and I look forward to continuing to evaluate the impact of this as we know more.

Sunday, March 22, 2015

Starting with Microsoft Band and Xamarin

Recently Xamarin released their API for Microsoft Band that works with Android, iOS and Windows Phone. It was a tough choice on what to play with before vacation;  a new Xamarin Forms preview that works with Windows Store and Windows Phone 8.1 was released as well as Xamarin Everywhere that hits Android Wear and Apple Phone. A complete overload of super cool stuff.

But ... last week I got a new Microsoft Band and you know, time to play.  First off, the Band isn't really a Smart Watch.  It's more a like a fitness device on steroids.  You can pull all kinds of sensor information out of it, you can also send notifications to it and play with it's appearance. What you can't really do is input information into the Band and have to do something on the phone. That is to say the band is about collecting sensor information and consuming information but not for inputting information like a "true" smart watch allows.

Xamarin has wrapped the Microsoft platform APIs, pretty much verbatim. One thing they have done which is nice is if the calls are asynchronous on Android, they have Task returning versions. However, like the Microsoft platform specific versions the APIs do not match from platform to platform so making cross platform code will still be challenging unless you wrap them in your own unified interface.  Xamarin has a nice page on the component store that explains the basics of the APIs which are pretty easy to use.  They can be found here:

https://components.xamarin.com/view/microsoft-band-sdk

With that in mind I set out to give this a try.  Since my Band is currently synchronized with an Android device I am working with the Android version of the API.  First I figured I'd try to add and then remove an icon from my Band that could receive notifications and messages.  I created a class to open and close the connection.

public class BandConnection : IDisposable
{
    private IBandClient bandClient;
    private Activity context;

    public BandConnection(Activity context)
    {
        this.context = context;
        var pairedBands = BandClientManager.Instance.GetPairedBands();

        if (pairedBands != null && pairedBands.Length >= 1)
        {
            bandClient = BandClientManager.Instance.Create(context, pairedBands[0]);
        }
    }

    public async Task ConnectAsync()
    {
        if (bandClient == null)
        {
            throw new InvalidOperationException("BandClient is not set");
        }
        await bandClient.ConnectTaskAsync();
    }

    public async void Dispose()
    {
        if (bandClient != null && bandClient.IsConnected)
        {
            await bandClient.DisconnectTaskAsync().ConfigureAwait(false);
        }
    }
}

The class just takes in the current activity and then gets the first band registered with the device. If you were making a "real" application it may be a good idea to make some sort of screen to choose what Band the user wanted to connect to if there were more than one.  The ConnectAsync method opens the connection to the Band.  As you can see I use the ConnectTaskAsync method of the BandClient instead of ConnectAsync.  All the asynchronous Android APIs seem to be wrapped up with Task returning operations with that naming convention.  When the class is disposed, if the bandClient is connected, the connection is closed.

I added a simple method to create a new tile on my band if there is room for one.

public async Task AddTileAsync(string tileId, string tileName, BandIcon largeIcon, BandIcon smallIcon)
{
    if (bandClient == null)
    {
        throw new InvalidOperationException("BandClient is not set");
    } 
    var tiles = await bandClient.TileManager.GetTilesTaskAsync().ConfigureAwait(false);
    var id = UUID.FromString(tileId);

    var spacesRemaining = await bandClient.TileManager.GetRemainingTileCapacityTaskAsync().ConfigureAwait(false);
    if (spacesRemaining > 0 && !tiles.Any(t => t.TileId.ToString() == tileId))
    {
        var tileBuilder = new BandTile.Builder(id, tileName, largeIcon);
        if (smallIcon != null)
        {
            tileBuilder.SetTileSmallIcon(smallIcon);
        }
        var tile = tileBuilder.Build();
        await bandClient.TileManager.AddTileTaskAsync(context, tile);
    }
}

I have added two images to my Android project, as per the API specs. One image is 24x24 and the other 48x48.  I create them and convert them into the BandIcon format. The following code is what I used to call the AddTileAsync method.

using (var bandConnection = new BandConnection(this))
{
    if (bandConnection.BandClient != null)
    {
        await bandConnection.ConnectAsync().ConfigureAwait(false);
        var smallIconBitmap = ((BitmapDrawable)Resources.GetDrawable(Resource.Drawable.PhoneFinderSmall)).Bitmap;
        var smallIcon = BandIcon.ToBandIcon(Bitmap.CreateScaledBitmap(smallIconBitmap, 24, 24, false));
        var largeIconBitmap = ((BitmapDrawable)Resources.GetDrawable(Resource.Drawable.PhoneFinderLarge)).Bitmap;
        var largeIcon = BandIcon.ToBandIcon(Bitmap.CreateScaledBitmap(largeIconBitmap, 48, 48, false));

        await bandConnection.AddTileAsync(BandConstants.TileId, "Band Test", largeIcon, smallIcon).ConfigureAwait(true);
    }
}

When using this code it automatically sinks up to the device.  The tile is identified by a unique identifier that I added as a constant to my code. When running it will first ask the user if they want to add the new tile to the Band. You can see my "awesome" abilities as an icon designer:


After choosing allow the band synchronizes the new tile onto the Band.


By scrolling the tiles on the band the newly added tile appears.


I then added a method to remove the tile I just added.

public async Task RemoveTileAsync(string tileId)
{
    if (bandClient == null)
    {
        throw new InvalidOperationException("BandClient is not set");
    } 
    var tiles = await bandClient.TileManager.GetTilesTaskAsync().ConfigureAwait(false);
    var id = UUID.FromString(tileId);
    if (tiles.Any(t => t.TileId.ToString() == tileId))
    {
        await bandClient.TileManager.RemoveTileTaskAsync(id).ConfigureAwait(false);
    }
}

This worked without incident and the tile from my band went away.

Sending a message to the band was also simple. The API reference contains the following description on the difference between a message and a dialog:

App notifications come in two flavors:
- Dialogs – dialog notifications are popups meant to quickly display information to the user. Once the user dismisses the dialog, the information contained therein does not persist on the Band.
- Messages – message notifications are sent and stored in a specific tile, and a tile can keep up to 8 messages at a time. Messages may display a dialog as well.

I added this method to my class to create a message:

public async Task ShowMessageAsync(string tileId, string title, string body, DateTime date, bool showMessage)
{
    if (bandClient == null)
    {
        throw new InvalidOperationException("BandClient is not set");
    }
    var id = UUID.FromString(tileId);
    await bandClient.NotificationManager.SendMessageTaskAsync(id, title, body, date, showMessage);
}

This method calls into my ShowMessageAsync method and gets the device location, converts it to an address and displays it to the user.

using (var bandConnection = new BandConnection(this))
{
    if (bandConnection.BandClient != null)
    {
        await bandConnection.ConnectAsync().ConfigureAwait(false);

        var geocoder = new Geocoder(this);
        var addressList = await geocoder.GetFromLocationAsync(_currentLocation.Latitude, _currentLocation.Longitude, 10).ConfigureAwait(false);

        var address = addressList.FirstOrDefault();
        if (address != null)
        {
            var deviceAddress = new StringBuilder();
            for (int i = 0; i < address.MaxAddressLineIndex; i++)
            {
                deviceAddress.Append(address.GetAddressLine(i))
                .AppendLine(",");
            }

            await bandConnection.ShowMessageAsync(BandConstants.TileId, 
                "Test Message", 
                string.Format("Current address: {0}", deviceAddress), 
                DateTime.Now, 
                true).ConfigureAwait(true);
        }
    }       
}

The message comes across to the band as expected.


Additionally, as expected, a message indicator appears with our tile stating that one new message was received.


When selecting the tile the message appears fully (I blocked out my address).


Sending a dialog is similarly easy.  But as this test indicates the amount of text that can be displayed in the dialog is limited and there is no down button (see more) as with the message.  Dialogs should only be used for very short notifications.

public async Task ShowDialogAsync(string tileId, string title, string body)
{
    if (bandClient == null)
    {
        throw new InvalidOperationException("BandClient is not set");
    }
    var id = UUID.FromString(tileId);
    await bandClient.NotificationManager.ShowDialogTaskAsync(id, title, body);
}

When sending this over it shows up as a popup but does not add to the message counter or add to the message history. As the API documentation stated, the dialog is not retained.


That's it for my first go.  Vibrating the band was similarly easy. Next I'll poke around at getting data from the Band and perhaps customizing its appearance.  Generally I was pleased at how easy it was to work with but cross platform applications may want to create a unified interface.

Thursday, October 30, 2014

Xamarin.Forms Circle Images

It is a common pattern in mobile applications to display an image in the shape of a circle.  Xamarin.Forms does not have any functionality for this right out of the box but the Xamarin.Forms team showed us how this can be done at Evolve 2014.  That implementation can be found here:

Xamarin.Forms Team Circle Image

This implementation by +James Montemagno is good for making an exact circle with a white border.  It uses masking and it's really fast.  One thing it doesn't do is handle what happens when the height and width of the control are different or what happens when you set the Aspect property.  I'm ignoring the catch(Exception ex) statements James, but just don't let +Jason Bock see them! (not that my code is perfect either, I try to do better each and every day.)

So here is an example of the renderers when using with controls that have a different height and width with the Aspect property set:


OK, we can see that the Android and Windows Phone implementations in this scenario are about the same.  They always draw a round image though the two implementations show a slightly different portion of the picture.  It probably with have displayed fine had the control's height and width been the same.  These are generally behaving as would be expected under the Aspect Fit setting. 

The iOS implementation is doing something very different.  It is behaving as though the Aspect property were set to Fill in all scenarios.  The upshot of the deal is that in most cases the programmer is going to set the RequestedHeight and RequestedWidth the same and these renderers are going to be great (and fast).  But how about those other cases, what would we expect to see then?


This is what you would expect to see.  Aspect Fill fills the entire control and what portion of the circle image is outside of that area is cropped off.  The top and bottom in this case.  The fill setting takes the circle and spreads it out to fill the entire control area resulting in an oval.  Aspect Fit makes a perfect circle in the center of the control.  Since the control area is wider than it is tall a letterbox situation is created with blank space on either side of the circle.

Note: My Windows Phone implementation is now yet complete.  I'm currently using a renderer in the style that +James Montemagno created.

The following implementation is now in the open source XLabs library for Xamarin.Forms.  It can be found here XForms Labs.  As of the time of this writing it has not yet made it to the nuget package.

The first thing I did was create a custom view that derived from the standard Image view as so:

public class CircleImage : Image
{
}

Ok, I know what you may be thinking... Where's the beef?  As it turns out at the present time I don't need to change anything intrinsic about the view itself, just how it is rendered.  To do this I subclass from the Image view so I can create a custom renderer for that without impacting base Image view.

To use this in Xaml it is as simple as:

<?xml version="1.0" encoding="utf-8" ?>
<ContentPage xmlns="http://xamarin.com/schemas/2014/forms"
             xmlns:x="http://schemas.microsoft.com/winfx/2009/xaml"
             xmlns:controls="clr-namespace:Xamarin.Forms.Labs.Controls;assembly=Xamarin.Forms.Labs"
             x:Class="Xamarin.Forms.Labs.Sample.Pages.Controls.CircleImagePage">
        <controls:CircleImage HeightRequest="75" WidthRequest="100" HorizontalOptions="Fill" Aspect="AspectFill">
            <controls:CircleImage.Source>
                <OnPlatform x:TypeArguments="ImageSource">
                    <OnPlatform.iOS>
                        <FileImageSource File="panic.jpg" />
                    </OnPlatform.iOS>
                    <OnPlatform.Android>
                        <FileImageSource File="panic.jpg" />
                    </OnPlatform.Android>
                    <OnPlatform.WinPhone>
                        <FileImageSource File="Images/panic.jpg" />
                    </OnPlatform.WinPhone>
                </OnPlatform>
            </controls:CircleImage.Source>
        </controls:CircleImage>
</ContentPage>

Other than calling it a CircleImage and referencing it the line "xmlns:controls="clr-namespace:Xamarin.Forms.Labs.Controls;assembly=Xamarin.Forms.Labs"" it is just like working with a standard Image view.

So let's take a look at what I did with iOS to make a custom renderer:

[assembly: ExportRenderer(typeof(CircleImage), typeof(CircleImageRenderer))]
namespace Xamarin.Forms.Labs.iOS.Controls.CircleImage
{
    public class CircleImageRenderer : ImageRenderer

The header is exactly what you would expect.  The new renderer for the CircleImage is registered as part of the  namespace and the custom renderer derives from the ImageRenderer.

One of the things that I need to think about is how will I accomplish the Aspect property working.  This requires considering a few things, do I need to manipulate the image, if I do how do I know the image is loaded, ensure there are no memory leaks and finally use masking as the Xamarin.Forms implementation when possible because it performs better.

So right of the bat I want to do masking for Fill because that's what works by default.  First we'll look at the OnElementChanged method:

protected override void OnElementChanged(ElementChangedEventArgs<Image> e)
{
    base.OnElementChanged(e);

    if (Control == null || e.OldElement != null || Element == null || this.Element.Aspect != Aspect.Fill )
        return;

    var min = Math.Min(Element.Width, Element.Height);
    Control.Layer.CornerRadius = (float)(min / 2.0);
    Control.Layer.MasksToBounds = false;
    Control.ClipsToBounds = true;
}

This isn't normally where I would look for manipulating images as this is where the base class's ImageRenderer will start loading them asynchronously from the source.  I can however set a mask, which is what I do if the Aspect is Fill.

Where the real interesting code comes in is during OnElementPropertyChanged.  For my masking I want to know that the control is drawing and that means that the height and width have changed.  For the bitmap manipulation I need to know when the image is loaded from the source.  Luckily the Xamarin.Forms team sets an IsLoading property to true when the image starts loading and turns it to false when complete.  That means when the IsLoading property changes to false I know when the load operation is complete.

NOTE: On Windows Phone changes to the IsLoading property are not raised to the renderer's OnElementPropertyChanged method as they are in iOS and Android.  I suspect this is an oversight but for now other methods need to be used.

protected override void OnElementPropertyChanged(object sender, PropertyChangedEventArgs e)
{
    base.OnElementPropertyChanged(sender, e);

    if (Control == null) return;

    if (this.Element.Aspect == Aspect.Fill)
    {
        if (e.PropertyName == VisualElement.HeightProperty.PropertyName ||
            e.PropertyName == VisualElement.WidthProperty.PropertyName)
        {
            DrawFill();               
        }
    }
    else
    {
        if (e.PropertyName == Image.IsLoadingProperty.PropertyName
            && !this.Element.IsLoading && this.Control.Image != null)
        {
            DrawOther();
        }
    }
}

The code here is pretty simple.  Base on the right phase in the lifecycle and what Aspect we are using we either draw for our masking (DrawFill) or re-size the image (DrawOther).  For now I'll ignore the masking and focus on the DrawOther method.

private void DrawOther()
{
    int height = 0;
    int width = 0;
    int top = 0;
    int left = 0;

    switch (this.Element.Aspect)
    {
        case Aspect.AspectFill:
            height = (int)this.Control.Image.Size.Height;
            width = (int)this.Control.Image.Size.Width;
            height = this.MakeSquare(height, ref width);
            left = (((int)this.Control.Image.Size.Width - width) / 2);
            top = (((int)this.Control.Image.Size.Height - height) / 2);
            break;
        case Aspect.AspectFit:
            height = (int)this.Control.Image.Size.Height;
            width = (int)this.Control.Image.Size.Width;
            height = this.MakeSquare(height, ref width);
            left = (((int)this.Control.Image.Size.Width - width) / 2);
            top = (((int)this.Control.Image.Size.Height - height) / 2);
            break;
        default:
            throw new NotImplementedException();
    }

    UIImage image = this.Control.Image;
    var clipRect = new RectangleF(0, 0, width, height);
    var scaled = image.Scale(new SizeF(width, height));
    UIGraphics.BeginImageContextWithOptions(new SizeF(width, height), false, 0f);
    UIBezierPath.FromRoundedRect(clipRect, Math.Max(width, height) / 2).AddClip();

    scaled.Draw(new RectangleF(0, 0, scaled.Size.Width, scaled.Size.Height));
    UIImage final = UIGraphics.GetImageFromCurrentImageContext();
    UIGraphics.EndImageContext();
    this.Control.Image = final;
}

A couple of things to notice.  I look at the aspect to figure out the size of the image I need.  If it is Aspect Fill I expect that the image may be higher or wider than the control's requested width or height.  For Aspect Fit I expect that neither the height nor width of the image will be larger than the requested amounts but that at least one will be equal.  In both cases I expect the image to be square.

With the new width and height I now scale the image to the right size (image.Scale(new SizeF(width, height));).  I can then use the FromRoundedRect function to crop the image and make it round with the rest transparent.  When I am done I make the new image the image for the control's image property and that's what will be used.

Android was a little more complex but in many ways the same.  The first thing was that the masking works correctly with the Aspect Fit scenario instead of Fill like on iOS.  The second is that we want to apply the mask on the DrawChild method override and not OnElementPropertyChanged.

protected override bool DrawChild(Canvas canvas, global::Android.Views.View child, long drawingTime)
{
    if (this.Element.Aspect == Aspect.AspectFit)
    {
        var radius = Math.Min(Width, Height)/2;
        var strokeWidth = 10;
        radius -= strokeWidth/2;

        var path = new Path();
        path.AddCircle(Width/2, Height/2, radius, Path.Direction.Ccw);
        canvas.Save();
        canvas.ClipPath(path);

        var result = base.DrawChild(canvas, child, drawingTime);

        path.Dispose();

        return result;

    }

    return base.DrawChild(canvas, child, drawingTime);
}

I check to see if this is actually an Aspect Fit situation and if not just don't so anything.  If it is I want to clip the existing image.  The AddCircle command works nicely for this.  This command always takes a center X and Y and a radius to draw a circle.  We calculate how large we want the circle to be by looking at the width and height of the control as they have been calculated by this point.  Once this is done successfully we return true and have a nice round image view that fits nicely in the control's bounds.

For the other two we look at OnElementPropertyChanged like we did on iOS and if we are done loading convert the drawable into a bitmap.

protected async override void OnElementPropertyChanged(object sender, PropertyChangedEventArgs e)
{
    base.OnElementPropertyChanged(sender, e);
    if (e.PropertyName == Image.IsLoadingProperty.PropertyName && !this.Element.IsLoading
        && this.Control.Drawable != null)
    {
        //Should only be true right after an image is loaded
        if (this.Element.Aspect != Aspect.AspectFit)
        {
            using (var sourceBitmap = Bitmap.CreateBitmap(this.Control.Drawable.IntrinsicWidth, this.Control.Drawable.IntrinsicHeight, Bitmap.Config.Argb8888))
            {
                var canvas = new Canvas(sourceBitmap);
                this.Control.Drawable.SetBounds(0, 0, canvas.Width, canvas.Height);
                this.Control.Drawable.Draw(canvas);
                this.ReshapeImage(sourceBitmap);
            }
                    
        }
    }
}

Once we have a new source bitmap I call ReshapeImage to manipulate it:

private void ReshapeImage(Bitmap sourceBitmap)
{
    if (sourceBitmap != null)
    {
        var sourceRect = GetScaledRect(sourceBitmap.Height, sourceBitmap.Width);
        var rect = this.GetTargetRect(sourceBitmap.Height, sourceBitmap.Width);
        using (var output = Bitmap.CreateBitmap(rect.Width(), rect.Height(), Bitmap.Config.Argb8888))
        {
            var canvas = new Canvas(output);

            var paint = new Paint();
            var rectF = new RectF(rect);
            var roundRx = rect.Width() / 2;
            var roundRy = rect.Height() / 2;

            paint.AntiAlias = true;
            canvas.DrawARGB(0, 0, 0, 0);
            paint.Color = Android.Graphics.Color.ParseColor("#ff424242");
            canvas.DrawRoundRect(rectF, roundRx, roundRy, paint);
            paint.SetXfermode(new PorterDuffXfermode(PorterDuff.Mode.SrcIn));
            canvas.DrawBitmap(sourceBitmap, sourceRect, rect, paint);

            this.Control.SetImageBitmap(output);
            // Forces the internal method of InvalidateMeasure to be called.
            this.Element.WidthRequest = this.Element.WidthRequest;
        }
    }
}

Android works primarily in rectangles for the area to draw in.  I get two rectangles, a scaled rectangle that is used for the area to resize the image and a target rectangle for where it will display on the control.  A new target bitmap is created that will be used by the control.  I won't go too deeply into the image manipulation commands but one thing to notice is the DrawRoundRect has an x radius and a y radius.  That allows me to draw a nice oval in fill mode as I was not able to do in iOS.

The other thing that may look strange is setting the Element's WidthRequest property to itself.  I did this because I wanted to call the base class's InvalidateMeasure method to let the control take appropriate action with the new image.  Since this is a protected method I can't call it directly.  However, when the WidthRequest is set, InvalidateMeasure is then called.  It was just a way to force an InvalidateMeasure call.

I hope you find this useful.  The full code case be found in the XForms labs project and will shortly be coming to our nuget packages.  What's next?  Finishing the Windows Phone renderer and then adding a border, allowing the user to set the color and width.

I'll be speaking in a few weeks at Modern Apps Live in Orlando (strangely enough not on Xamarin).  I hope to see you there.  Modern Apps Live 2014 Orlando

Monday, July 7, 2014

Xamarin.Forms.Labs Version 1.1.0 Released

For the last several weeks several developers from around the globe have been working on a project to extend the functionality given in Xamarin.Forms to deliver more cross platform capabilities for Android, iOS and Windows Phone 8.  This project is called Xamarin.Froms.Labs.  Today we have released version 1.1.0 and it is now in Nuget for your use.

One of the largest improvements is in the structure of the packages themselves.  All platform specific packages are being depreciated in favor of single packages that install correctly for all supported platforms.

The 1.1.0 version includes the following package structure for use with Android, iOS and Windows Phone:
Xamarin.Forms.Labs - Core package containing PCL and platform specific dlls including custom controls, renderers and services.
Xamarin.Forms.Labs.Services.Autofac - Includes PCL with extensions to use with Autofac.
Xamarin.Forms.Labs.Services.Ninject - Includes PCL with extensions to use with Ninject.
Xamarin.Forms.Labs.Services.SimpleContainer - Includes PCL with extensions to use with Simple Injector.
Xamarin.Forms.Labs.Services.TinyIOC- Includes PCL and platform specific DLLs with extensions to use with TinyIOC
Xamarin.Forms.Labs.Services.Serialization.JsonNET - Includes PCL to use JsonNet with Xamarin.Forms.
Xamarin.Forms.Labs.Services.Serialization.ProtoBuf - Includes PCL to use ProtoBuf with Xamarin.Forms.
Xamarin.Forms.Labs.Cryptography - Includes PCL to give cross platform cryptography with Xamarin.Forms.
Xamarin.Forms.Labs.Caching.SQLiteNet - Includes PCL to enable cross platform caching using SQLite with Xamarin.Forms.

The following packages are being depreciated or not part of 1.1.0, primarily because of their platform specific nature:
Xamarin.Forms.Labs.Droid
Xamarin.Forms.Labs.iOS
Xamarin.Forms.Labs.WP
Xamarin.Forms.Labs.Services.Serialization.ServiceStackV3
Xamarin.Forms.Labs.Services.Serialization.ServiceStackV3.Droid
Xamarin.Forms.Labs.Services.Serialization.ServiceStackV3.iOS
Xamarin.Forms.Labs.Services.Serialization.ServiceStackV3.WP8
Xamarin.Forms.Labs.Services.TinyIOC.Droid
Xamarin.Forms.Labs.Services.TinyIOC.iOS
Xamarin.Forms.Labs.Services.TinyIOC.WP8

Information about the contents and features of Xamarin.Forms.Labs can be found on our wiki here:
Xamarin.Forms.Labs Wiki

The following bugs/features are part of 1.1.0:
-Changed structure of Nuget packages to remove platform specific packages.
-Corrected references in Nuget packages.
-XML documentation and source added to Nuget packages.
-ImageButton with no size specified no longer throws an exception.
-WebImage control added with Android and iOS implementations.
-Fixed Json serializer so default settings are no longer null.
-Changed ImageButton to use the standard Xamarin.Forms Source property for the image to display instead of a string Image property.  The Image property was removed as a result.  This is a breaking change.
- Fixed issue with HybridWebView callback not being called.
- Corrected issue where ViewFactory did not support mutliple Views with the same view model.
-Renderer support for Windows Phone added for the ExtendedLabel, ExtendedTextCell and the ExtendedViewCell.
- Renderer support for Android added for the ExtendedViewCell.
- Platform specific font properties on the ExtendedLabel are depreciated.
- RelayCommand depreciated.

If  you would like to know more about the Xamarin.Forms.Labs team, would like to contribute functionality, comment or enter a bug you can always go to our repository on GitHub: Xamarin-Forms-Labs.

Thanks and happy coding!

Monday, June 30, 2014

Xamarin.Forms Custom Controls ImageSource

Xamarin.Forms has a great way to handle images cross platform in controls with the ImageSource.  The ImageSource allows you to specify the file name or URI of an image and a Xamarin.Forms handler will figure out how to load them correctly on the appropriate platform.  The following Xamarin site explains how to use the ImageSource for the stock controls that come with Xamarin.Forms

Working with Images

What if you want to make your own custom control, can you write it to use an ImageSource property?  This was the question I faced when creating an ImageButton control for the Xamarin Forms Labs project.  As it turns out it isn't as straightforward as I hoped, but it is possible.

To make this work first I created an ImageButton class that derived from the normal Button as so:

public class ImageButton : Button
{
    public static readonly BindableProperty SourceProperty =
        BindableProperty.Create<ImageButton, ImageSource>(
        p => p.Source, null);
        
    [TypeConverter(typeof(ImageSourceConverter))] 
    public ImageSource Source
    {
        get { return (ImageSource)GetValue(SourceProperty); }
        set { SetValue(SourceProperty, value); }
    }
}

One thing to note is that there is a TypeConverter on the Source property.  That is because the ImageSource cannot be created through a normal constructor passing in the string.  Instead there are factory methods, FromFile and FromUri to create instances of the ImageSource class.  Xamarin.Forms has a ImageSourceConverter class as a TypeConverter for this purpose; unfortunately this class is internal and can't be used directly.  Instead I made my own implementation as below.

public class ImageSourceConverter : TypeConverter
{
    public override bool CanConvertFrom(Type sourceType)
    {
        return sourceType == typeof(string);
    }

    public override object ConvertFrom(CultureInfo culture, object value)
    {
        if (value == null)
        {
            return null;
        }

        var str = value as string;
        if (str != null)
        {
            Uri result;
            if (!Uri.TryCreate(str, UriKind.Absolute, out result) || !(result.Scheme != "file"))
            {
                return ImageSource.FromFile(str);
            }
            return ImageSource.FromUri(result);
        }
        throw new InvalidOperationException(
            string.Format("Conversion failed: \"{0}\" into {1}",
                new[] { value, typeof(ImageSource) }));
    }
}

We need one more thing before we can create our custom renderers.  There are three handlers that convert our ImageSource to the proper platform specific image depending on if a UriImageSource, FileImageSource or StreamImageSource is being used.  Internally Xamarin.Forms uses the Xamarin.Forms.Registrar to resolve out the proper handler.  Unfortunately this class is also internal and can't be used by our custom renderers.  To solve this I created a class and linked it to my platform specific projects where my custom renderers will reside.  This is the class I used to resolve out the proper handler:

#if __Android__
using Xamarin.Forms.Platform.Android;

namespace Xamarin.Forms.Labs.Droid.Controls.ImageButton
#elif __IOS__
using Xamarin.Forms.Platform.iOS;

namespace Xamarin.Forms.Labs.iOS.Controls.ImageButton
#elif WINDOWS_PHONE
using Xamarin.Forms.Platform.WinPhone;

namespace Xamarin.Forms.Labs.WP8.Controls.ImageButton
#endif
{
    public partial class ImageButtonRenderer
    {
        private static IImageSourceHandler GetHandler(ImageSource source)
        {
            IImageSourceHandler returnValue = null;
            if (source is UriImageSource)
            {
                returnValue = new ImageLoaderSourceHandler();
            }
            else if (source is FileImageSource)
            {
                returnValue = new FileImageSourceHandler();
            }
            else if (source is StreamImageSource)
            {
                returnValue = new StreamImagesourceHandler();
            }
            return returnValue;
        }
    }
}

Then I implemented my custom renderers.  I'm not going to show all of their code here and if you want to see the full code check out the Xamarin.Forms.Labs project on Github.  For the iOS platform renderer i resolved out the ImageSource into a iOS UIImage like this:

private async static Task SetImageAsync(ImageSource source, int widthRequest, int heightRequest, UIButton targetButton)
{
    var handler = GetHandler(source);
    using (UIImage image = await handler.LoadImageAsync(source))
    {
        UIGraphics.BeginImageContext(new SizeF(widthRequest, heightRequest));
        image.Draw(new RectangleF(0, 0, widthRequest, heightRequest));
        using (var resultImage = UIGraphics.GetImageFromCurrentImageContext())
        {
            UIGraphics.EndImageContext();
            using (var resizableImage =
                resultImage.CreateResizableImage(new UIEdgeInsets(0, 0, widthRequest, heightRequest)))
            {
                targetButton.SetImage(
                    resizableImage.ImageWithRenderingMode(UIImageRenderingMode.AlwaysOriginal),
                    UIControlState.Normal);
            }
        }
    }
}

On the Android platform's custom renderer for the ImageButton I resolved it out like this:

private async Task<Bitmap> GetBitmapAsync(ImageSource source)
{
    var handler = GetHandler(source);
    var returnValue = (Bitmap)null;

    returnValue = await handler.LoadImageAsync(source, this.Context);

    return returnValue;
}

On the Windows Phone platform I resolved out the ImageSource like this:

private async static Task<System.Windows.Controls.Image> GetImageAsync(ImageSource source, int height, int width)
{
    var image = new System.Windows.Controls.Image();
    var handler = GetHandler(source);
    var imageSource = await handler.LoadImageAsync(source);

    image.Source = imageSource;
    image.Height = Convert.ToDouble(height / 2);
    image.Width = Convert.ToDouble(width / 2);
    return image;
}

That's how I implemented the Source property on my custom ImageButton control and now I get all the cross platform image handling goodness.  I hope this helps if you need to make a Xamarin.Forms custom control that needs to implement a cross platform image.

Thursday, May 29, 2014

Xamarin 3.0 and Xamarin.Forms - Getting Started

A while back I blogged about the possibility of Xamarin using something like XAML as a standard way to write UX because it isn't the platform specific syntax that's important; it's the platform specific look and behavior that's important.  Today Xamarin introduced Xamarin 3.0 and with it Xamarin.Forms that appears to do just that; we write in XAML and we get native controls out the other side.  The promise of Xamarin.Forms is that (for the most part) we need to know one UI syntax, XAML.

Please note, this does not mean that we want to make the same exact UI for Android, iOS and Windows Phone.  In fact that would produce a substandard user experience.  But to the extent possible, it's isn't the syntax that matters, only appearance and behavior.  Xamarin.Forms gives us a much greater possibility of sharing UI code across platforms than ever before while still maintaining a native experience.

For the most part I don't think we are going to be using Xamarin.Forms for a lot of applications that we would have considered using complex native UIs a few months ago because there are going to be some platform specific tweaks that are still going to demand a native design experience.  But that's OK because in such an application you can mix Xamarin.Forms for the more generic native experiences in the application with native forms where we need to do something very platform specific.

So where does that leave Xamarin.Forms?  Its sweet spot would seem to be when we may have considered using a hybrid tool like PhoneGap or Appcellerator for cross platform development.  Because Xamarin.Forms still produces a native UI it will produce a much better native experience for the user while giving us all the cross platform UI code sharing that we would get from these tools.  It would seem to be a far superior choice and extremely compelling.

I wanted to try this out.  Xamarin has an introduction that I found useful here:
http://developer.xamarin.com/guides/cross-platform/xamarin-forms/introduction-to-xamarin-forms/

It is day two of playing around with this for me and let me tell you Xamarin.Forms seems vast, very vast.  There is a lot to learn here and I look forward to attending next weeks Xamarin University class on Xamarin.Forms.  It is going to take a bit of time to really learn how to use it well.  For my first project I wanted to use actual XAML files and also use the new Universal Application Shared Projects.  For many reasons I believe this will be a better approach for most cross platform projects than using a PCL.

Here's what I did:

Step 1: Install Xamarin 3.0.  Just use the normal update process, no magic here.

Step 2: Create a new solution with projects for the platform specific UIs we want to support.  For my solution I selected an Android Application and an iOS empty Universal Application.


Step 3: Add a Xamarin.Forms project.  A Xamarin.Forms project is a project that provides shared code to the Android and iOS projects we just created.  This can be accomplished by using a portable class library or the new universal shared application.  Unfortunately in Visual Studio there are only three templates currently available under the Mobile Apps section.  One is used to create a multi-project solution with shared code through a portable class library, one to create a multi-project solution using a universal application shared project and one to create a new Xamarin.Form portable class library on it's own.  There is currently no template to create a Universal Application Shared Xamarin.Forms project on its own.  Luckily this is possible using the Universal Application Extension.  With this extension I created a new Universal Application Shared Project for my Xamain.Forms that I want to share with both projects and then put my Xamarin.Forms code in there.


Step 4: Add a reference to the Xamarin.Forms project to our iOS and Android projects.  This can be done by right clicking on references and selecting Add Nuget Package.  Search for the Xamarin.Forms project and add it.  Also add a Shared Project Reference for the new Universal Application Shared Project in the iOS and Android projects.


Step 5: Add a new Forms XAML Page to the Shared Project we created.  I called mine SharedForm.xaml.


Note: When I try to open the XAML file I get a designer error but I am still able to edit the XAML directly. From the Xamain.Forms forum on the Xamarin site it looks like there is currently no visual designer for this.  It was strongly hinted that one is in the works however.  I added a label and a button to make a very simple form that I called SharedForm.xaml.  The following is the code in my XAML file:


<?xml version="1.0" encoding="utf-8" ?>
<ContentPage xmlns="http://xamarin.com/schemas/2014/forms"
                       xmlns:x="http://schemas.microsoft.com/winfx/2009/xaml"
                       x:Class="XamarinFormsTest.Shared.SharedForm">
    <StackLayout Spacing="10">
        <Label Text="Foo" VerticalOptions="Center" HorizontalOptions="Center" />
        <Button Text="Bar" x:Name="btnBar" />
    </StackLayout>
</ContentPage>

Step 6: I want to show a popup window of some sort when they click on my new "bar" button.  It wouldn't surprise me to learn there is some sort of cross platform library for this in Xamarin.Forms but I don't know what it is.  Instead I used a Toast for Android and a UIAlertView for iOS.  This is where using a Universal Application Shared Project really shines.  Using the a conditional compilation symbol of __Android__ in the Android project and __IOS__ in the iOS project I was able to do the following:


   1:  public partial class SharedForm : ContentPage
   2:  {
   3:      public SharedForm ()
   4:      {
   5:          InitializeComponent();
   6:          btnBar.Clicked += btnBar_Click;
   7:      }
   8:   
   9:      private void btnBar_Click(object sender, EventArgs e)
  10:      {
  11:  #if __ANDROID__
  12:          Android.Widget.Toast.MakeText(Android.App.Application.Context, "Test 123", Android.Widget.ToastLength.Short).Show();
  13:  #elif __IOS__
  14:          new MonoTouch.UIKit.UIAlertView("Test", "Test 123", null, "Ok", null).Show();
  15:  #endif
  16:      }
  17:  }
  
First I made the SharedForm partial class inherit from ContentPage.  This shouldn't be necessary because the generated version of SharedForm also inherits from ContentPage but there seems to be some bug in the Universal Shared Projects where this wasn't recognized in the Visual Studio designer.  It was just easier to add it.

I also tied the click event of the button to a new method, btnBar_Click.  If we are compiled into the Android application the Toast message is used in the method, otherwise the UIAlertView is used for iOS.

Step 7: I went into the android project's main activity and changed it so it inherits from AndroidActivity instead of Activity.  I also made a call to Forms.Init() and created a new instance of my SharedFrom.  A quick call to SetPage and my XAML form is used.


   1:  [Activity(Label = "XamarinFormsTest", MainLauncher = true, Icon = "@drawable/icon")]
   2:  public class MainActivity : AndroidActivity
   3:  {
   4:      protected override void OnCreate(Bundle bundle)
   5:      {
   6:          base.OnCreate(bundle);
   7:  
   8:          Xamarin.Forms.Forms.Init(this, bundle);
   9:   
  10:          var form = new SharedForm();
  11:          SetPage(form);
  12:      }
  13:  }

When I run the application and click on the "Bar" button this is what I see:


Step 8:  I want to try the same thing for iOS.  So I go to the iOS project's AppDelegate.  In the FinishedLaunching event I again call Forms.Init() and then create an instance of my XAML form.  On the form there is a CreateViewController() method that I call to set the window's RootViewController.


   1:  public override bool FinishedLaunching(UIApplication app, NSDictionary options)
   2:  {
   3:      // create a new window instance based on the screen size
   4:      window = new UIWindow(UIScreen.MainScreen.Bounds);
   5:   
   6:      // If you have defined a view, add it here:
   7:      // window.RootViewController  = navigationController;
   8:      Forms.Init();
   9:   
  10:      var form = new SharedForm();
  11:      window.RootViewController = form.CreateViewController();
  12:   
  13:      window.MakeKeyAndVisible();
  14:   
  15:      return true;
  16:  }

I then run the project on the iOS simulator, click on the "Bar" button and this is what I see there:


Similar but different.  I used the same UI syntax for a button and in one case I got an android button and here I got an iOS 7 style button, nice and flat.  Granted this was a simple example and it looks like my label got a bit mixed up with text at the top of the iOS simulator.  There is clearly more experimentation and learning I need to do.  But the idea seems to work.  Almost all of my code was shared and I was able to do it with little fuss or muss.

Very exciting and I'm ready to learn more.